What You’ll Need:
Rimmed Layer:
10″ Silicone Loaf Mold
Wire Soap Slicer
3 oz. Canola Oil
3 oz. Coconut Oil
3 oz. Palm Oil
3 oz. Rice Bran Oil
1.7 oz. Sodium Hydroxide Lye
4 oz. Distilled Water
Titanium Dioxide
Ultramarine Blue Pigment
Mermaid Blue Mica
Black Oxide Pigment
0.8 oz. Island Escape Fragrance Oil
Optional: 4 Squeeze Bottles
Sodium Lactate
Main Soap
Heavy Duty Column Mold with Reusable Liner
5.5 oz. Canola Oil
5.5 oz. Coconut Oil
5.5 oz. Palm Oil
5.5 oz. Rice Bran Oil
3.1 oz. Sodium Hydroxide Lye
7.3 oz. Distilled Water
Titanium Dioxide
Mermaid Blue Mica
1.4 oz. Island Escape Fragrance Oil
MAKE THE OUTER RIM
If you’ve never made Cold Process soap before, stop here! I highly recommend checking out our FREE four part SoapQueen.tv series on Cold Process Soapmaking, especially the episode on lye safety. And if you’d rather do some reading, Bramble Berry carries a wide range of books on the topic, including my newest book, Pure Soapmaking. You can also checkout the digital downloads for that instant gratification factor.
SAFETY FIRST: Suit up for safe handling practices! That means goggles, gloves and long sleeves. Make sure kids, pets, and other distractions and tripping hazards are out of the house or don’t have access to your soaping space. Always soap in a well-ventilated area.
COLOR PREP: To ensure that the Titanium Dioxide blends smoothly into the soap batter, we recommend micronizing it before dispersing it in oil. Please note this is an optional tip but it does help with the titanium dioxide clumping in the soap. =) To micronize colorant, simply use a coffee grinder to blend the colorant to break up any clumps of color and prevent streaks of white from showing in the final soap. We like to use a coffee grinder that has a removable, stainless steel mixing area for easy cleaning. Then, disperse 1/2 teaspoon of the colorant into 1/2 tablespoon of sunflower or sweet almond oil (or any other liquid oil). Then in separate containers disperse 1/2 teaspoons of Black Oxide, Mermaid Mica and Ultramarine Blue Pigment into 1/2 tablespoon lightweight liquid oil. Use a mini mixer to help get rid of any chunks.
FRAGRANCE PREP: Measure out 0.8 oz. of Island Escape Fragrance Oil into a glass, fragrance oil safe container. Set aside.
TOOL PREP: To create thin and wispy swirls, I like to use squeeze bottles to layer thin strips of color. You can use containers with a fine pour spout, but the swirl may be larger. If you’re using squirt bottles for this step, have them nearby and ready.
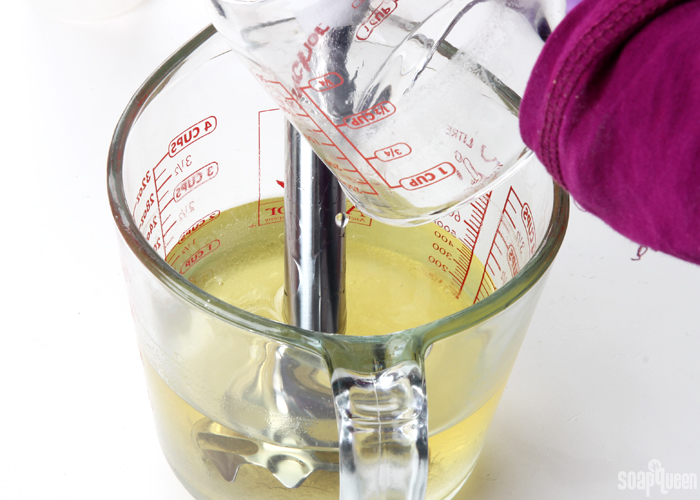
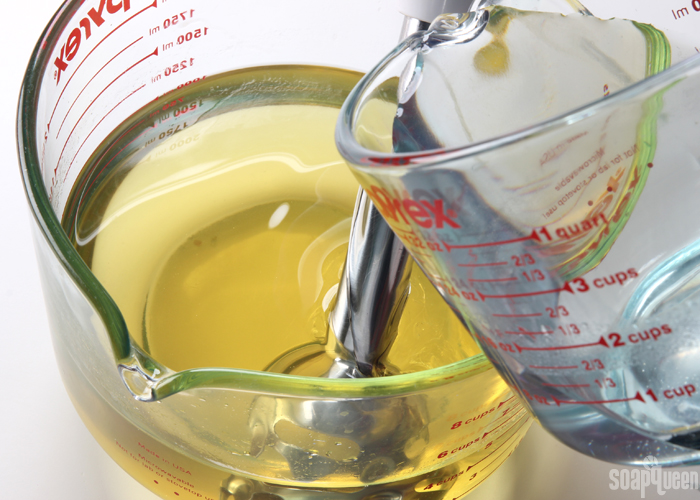
ONE: Slowly and carefully add the lye to the water and gently stir until the lye has fully dissolved and the liquid is clear. Set aside to cool.
TWO: Fully melt the coconut oil, canola oil, rice bran oil and palm oil (remember to fully melt then mix your entire container of palm oil before portioning). Once the lye water and the oils have cooled to 110-120 F degrees or below (and are ideally within 10 degrees of each other), add the lye water to the oils and stick blend until very thin trace. For this project, I highly recommend using sodium lactate in the lye water for the rim part of the soap. Sodium lactate helps soap harden in the mold faster. For this project, it allows you to remove the soap after 24 hours of pouring the soap into the mold. During this point, the soap is still soft enough to bend into a circle shape, and the sodium lactate helps it release cleanly from the mold.
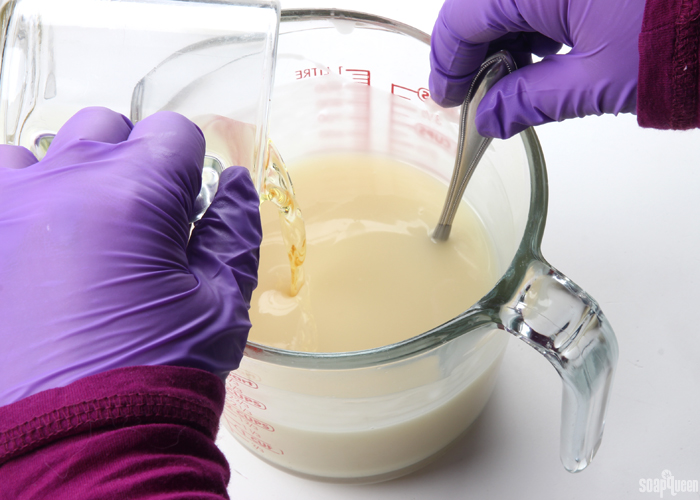
 THREE: Add the measured 0.8 ounces of Island Escape Fragrance Oil into the soap, and use a whisk or spoon to thoroughly mix in.
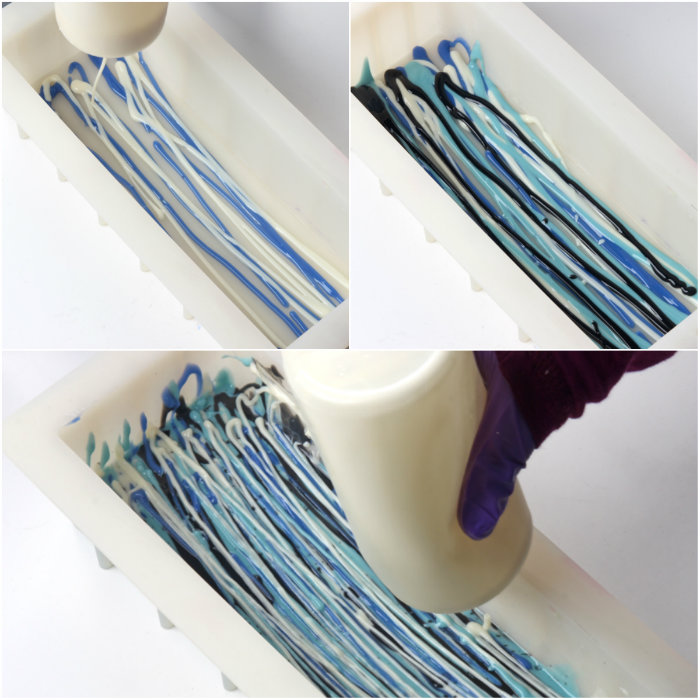
 FOUR: Split the batter evenly into four separate squeeze bottles. You could use containers with a very fine pour spout, but squirt bottles are the best way to create thin, wispy swirls. Add the following amounts of dispersed colorants into each bottle/container:
- A (White): 1/2 tsp. dispersed Titanium Dioxide
- B (Black): 1/4 tsp. dispersed Black Oxide
- C (Dark Blue): 1/4 tsp. dispersed Ultramarine Blue Pigment
- D (Light Blue): 1/4 tsp. dispersed Mermaid Mica + 1/4 tsp. Titanium Dioxide
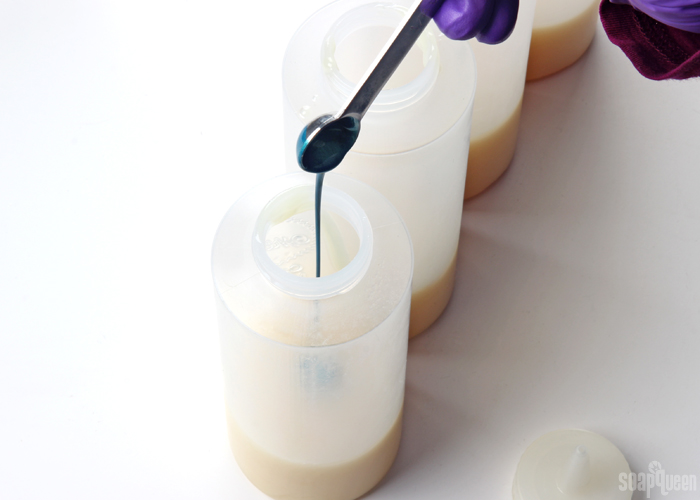 FIVE: Twist the tap on tightly and shake each bottle thoroughly to fully mix in the colorants. Once the soap is completely mixed with the colorants, begin squirting it into the 10″ Silicone Loaf Mold lengthwise. Squirt several “strips” of color into the mold lengthwise, then switch colors. Don’t worry too much about the placement of the colors at first; work quickly to prevent the soap from getting to thick. If you’re not using squirt bottles, try to pour extremely thin lines of soap. Continue this process until you have used up all the soap. During the last pour of each color, try to layer the colors so a portion of each is showing. This will help the swirl feature each shade. Tap the mold firmly on the counter to help get rid of air bubbles.
 SIX: Insert a thin skewer or chopstick into the soap all the way to the bottom of the mold. Begin swirling the soap back and forth widthwise down the entire length of the mold.
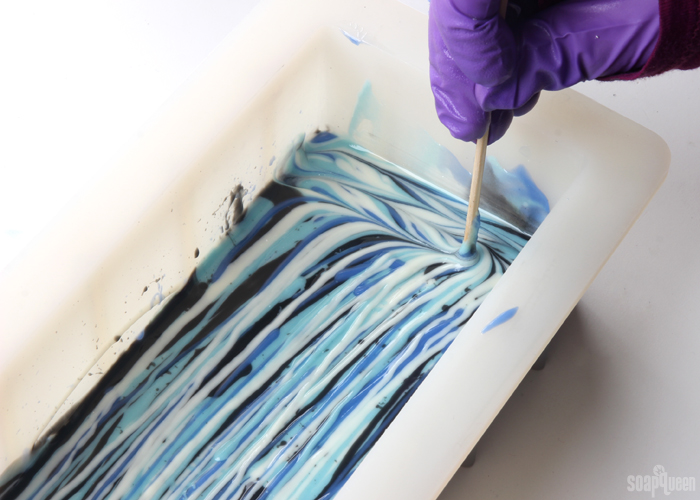
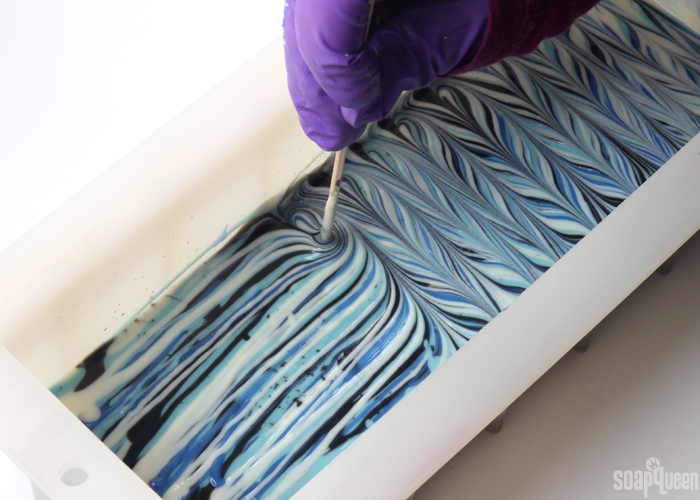 SEVEN: Once you reach the other side of the mold, use the chopstick/skewer to circle around the outside of the mold. This gives the outside a bit of a curve, and is a nice finishing touch. Spritz the top of the soap with 99% isopropyl alcohol to help prevent soda ash. It’s important that the soap stays warm and goes through gel phase. I did not insulate the soap to promote gel phase, but it was left in a warm room of about 75 ° F. If your room is cool, place the soap on a heating pad and insulate to help it stay warm. Allow the soap to harden in the mold for 24 hours.
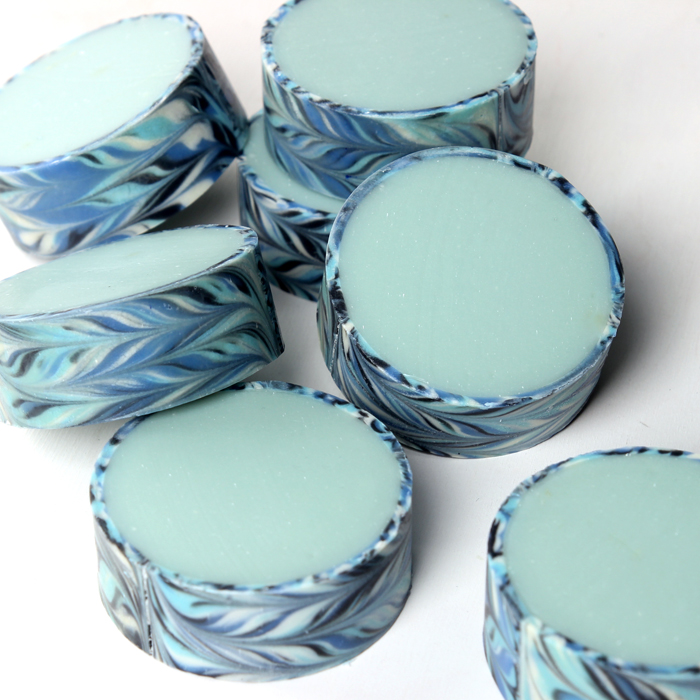
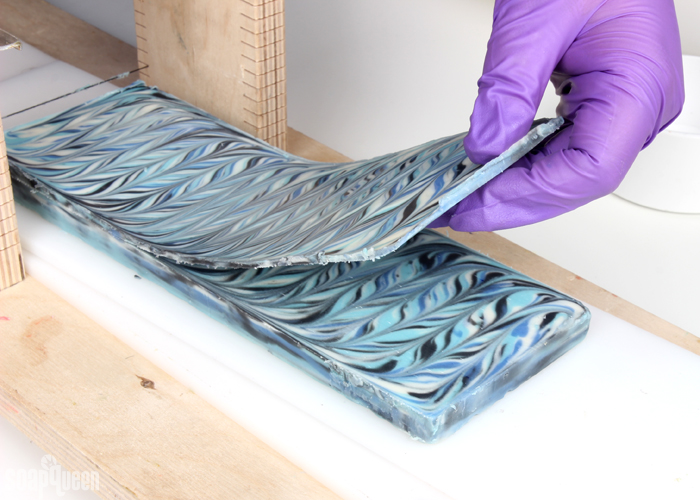
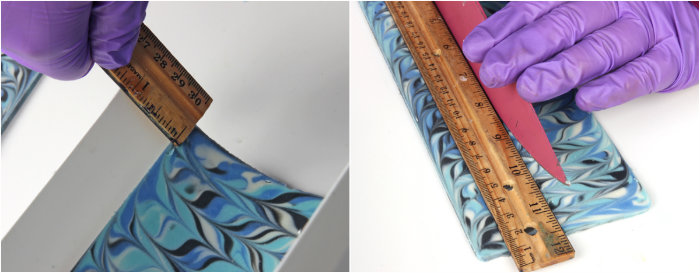
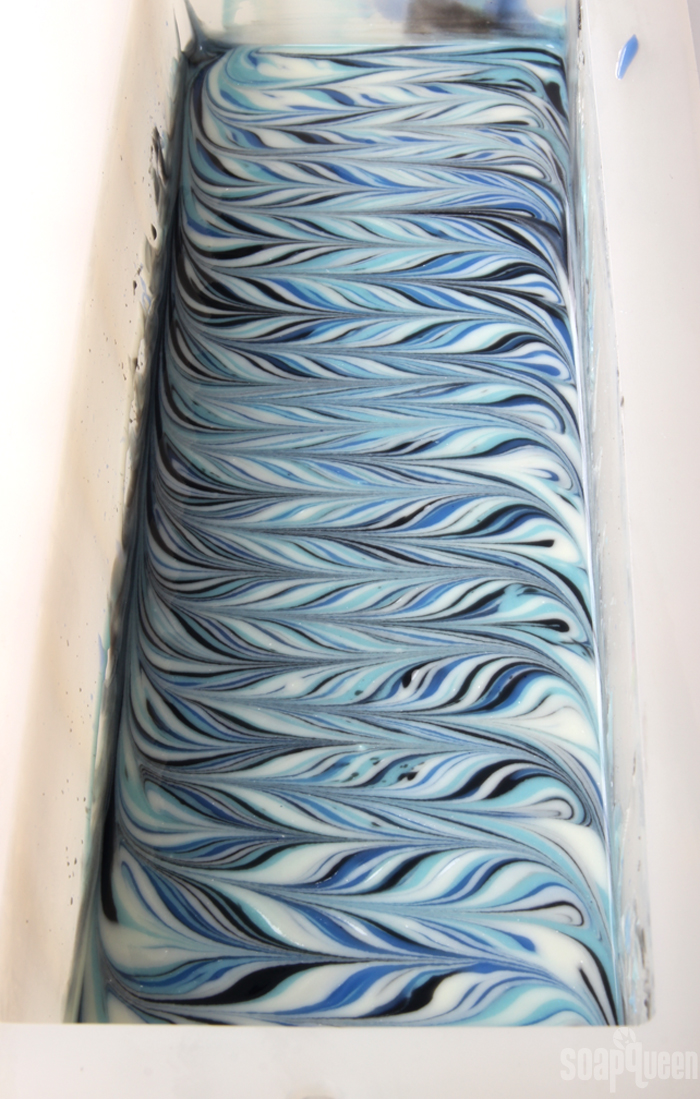 EIGHT: After 24 hours, carefully remove the soap from the mold. I don’t recommend waiting to unmold any longer than 24 hours. If the soap hardens in the mold for too long, it will loose the flexibility that is crucial for creating a circle shape. Once it has been removed, it’s time to use the Wire Soap Slicer to create very thin slices of the soap. Place the Wire Soap Slicer on the counter. Allow the end of the slicer to hang over the edge of the counter; the “lip” of the slicer will press against the edge of the counter to hold the slicer in place while pushing the soap through.
NOTE: Some tutorials do not slice the soap into thinner strips. If you created a very thin layer of soap (thinner than the recipe above) you may not need to use the slicer to make thin pieces of soap. But, the thinner the soap the more flexible it will be. The more flexible the soap, the less likely it will be to crack when placed in the column mold.
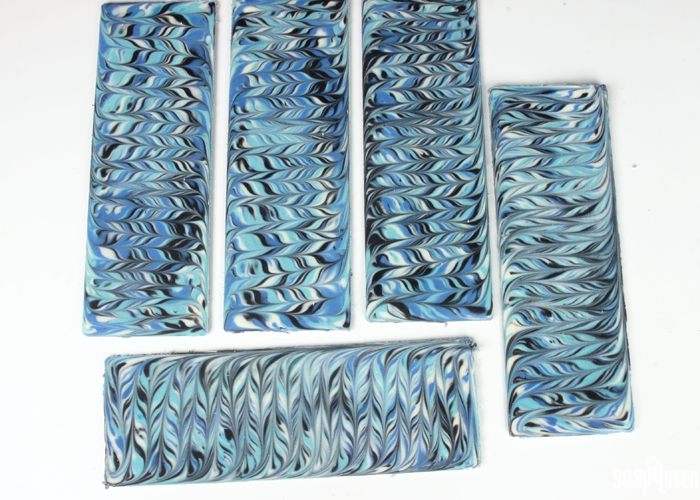
NINE: For this project, you need three strips of swirled soap to create the rim. In general, thinner strips of soap are more flexible and are less likely to crack when placed inside the Heavy Duty Column Mold. I managed to make 5 very thin strips out of the swirled soap. The top “slice” of soap will have a slight texture, so I recommend using the pieces in the center to create the rim. The center pieces will also be more flexible. Place the soap on the plastic piece of the Wire Soap Slicer and adjust the wire to take off a very thin slice off the top. Slowly push the soap across the wire to begin slicing. The soap may curl up as it goes over the wire; keep it straight by gently placing your hand on the top as it runs across the wire.
 TEN: Continue adjusting the wire (you will need to use both sides of the slicer) to create thin slices of soap. Handle each layer with care as they are very delicate. The exact depth of each slice may vary depending on how tall your swirled soap ended up being. For this project I used squirt bottles, so some of the soap didn’t make it into the mold. If you did not use squeeze bottles, your soap may be larger and you may be able to create more slices. For the first slice I used the 2nd notch on the “higher” side of the slicer. Then, I flipped the slicer around and used the 2nd notch on the “lower” side of the slicer. Then, I flipped it back to use the 1st notch. Keep adjusting the wire to go lower and lower to create the thin slices.
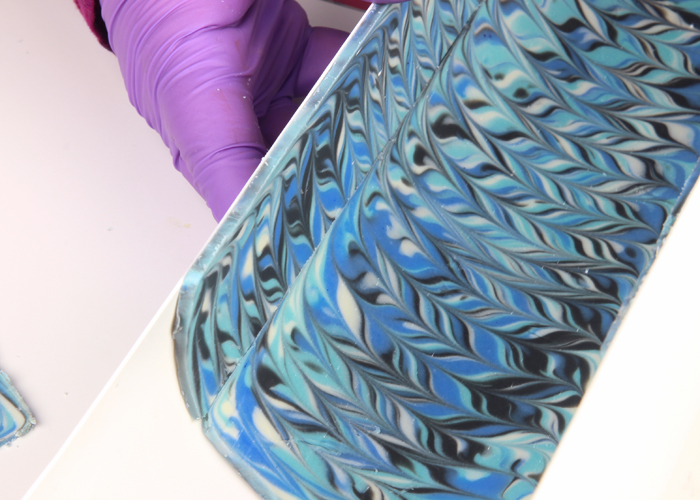
 ELEVEN: Once you’re done slicing the soap, lay one of the slices onto the reusable liner of the Heavy Duty Column Mold. Then, lay another slice next to it.
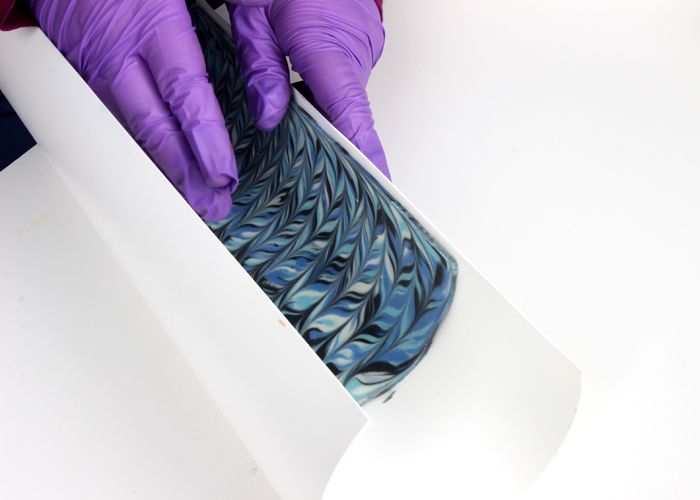
 TWELVE: There will be a small portion of the liner not covered in soap. Measure the width of the gap on the liner, and cut a strip of the same width from a soap slice. Place the strip on the liner. Gently press each strip of soap onto the reusable liner to help it “stick” once it’s rolled up. Then, gently press the area where the pieces of soap touch to help them stick together a little better.
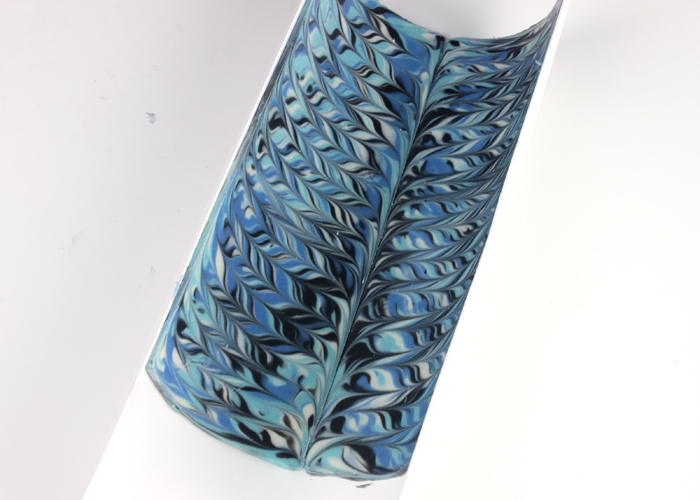
 THIRTEEN: Carefully roll the liner up and insert the liner into the Heavy Duty Column Mold. It’s nice to have a friend help with this step to keep both ends curled up, and to avoid over bending the liner. That can cause the slices of soap to crack. If a soap slice cracks, don’t panic! One of my slices actually cracked on me. You can use one of the other slices, or use your fingers to press and mend the crack. I recommend removing your gloves for this, as the warmth of your hands make the soap more pliable.
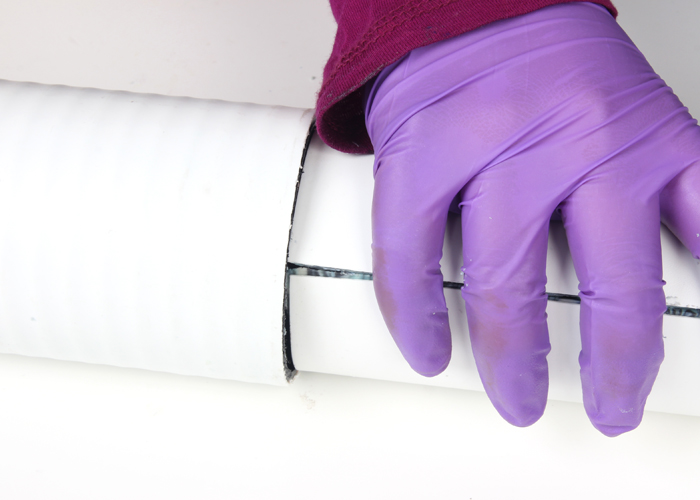
Once the liner is inserted, it’s time to prep the base! Don’t wait to make the base. As the strips of soap stay in the liner, they will begin to dry and shrink. The base soap will also be less likely to stick to the outer rim the longer you wait.
TIP: Once the liner was inserted, I used a dowel to roll the edges of the slices to create a smoother look.
MAKE THE BASE
If you’ve never made Cold Process soap before, stop here! I highly recommend checking out our FREE four part SoapQueen.tv series on Cold Process Soapmaking, especially the episode on lye safety. And if you’d rather do some reading, Bramble Berry carries a wide range of books on the topic, including my newest book, Pure Soapmaking. You can also checkout the digital downloads for that instant gratification factor.
SAFETY FIRST: Suit up for safe handling practices! That means goggles, gloves and long sleeves. Make sure kids, pets, and other distractions and tripping hazards are out of the house or don’t have access to your soaping space. Always soap in a well-ventilated area.
COLOR PREP: To ensure that the Titanium Dioxide blends smoothly into the soap batter, we recommend micronizing it before dispersing it in oil. Please note this is an optional tip but it does help with the titanium dioxide clumping in the soap. =) To micronize colorant, simply use a coffee grinder to blend the colorant to break up any clumps of color and prevent streaks of white from showing in the final soap. We like to use a coffee grinder that has a removable, stainless steel mixing area for easy cleaning. Then, disperse 1 teaspoon of the colorant into 1 tablespoon of sunflower or sweet almond oil (or any other liquid oil). Then, disperse 1/2 teaspoon of Mermaid Mica into 1/2 tablespoon lightweight liquid oil. Use a mini mixer to help break up any clumps.
FRAGRANCE PREP: Measure out 1.4 oz. of Island Escape Fragrance Oil into a glass, fragrance oil safe container. Set aside.
ONE: Slowly and carefully add the lye to the water and gently stir until the lye has fully dissolved and the liquid is clear. Set aside to cool.
TWO: Fully melt the coconut oil, canola oil, rice bran oil and palm oil (remember to fully melt then mix your entire container of palm oil before portioning). Once the lye water and the oils have cooled to 110-120 F degrees or below (and are ideally within 10 degrees of each other), add the lye water to the oils and stick blend until a thin trace. If you’d like a harder bar of soap that releases faster from the mold, you can add sodium lactate to the cooled lye water. Use 1 teaspoon of sodium lactate per pound of oils in the recipe. For this recipe, you’d add about 1.5 tsp. sodium lactate.
 THREE: Once you reach a thin trace, add the 1.4 ounces of Island Escape Fragrance Oil into the soap and use a whisk to mix in. Then add 1/2 tsp. dispersed Mermaid Mica and all of the dispersed Titanium Dioxide. If the soap is still extremely thin, use a the stick blender to pulse and thicken the batter to a medium trace.
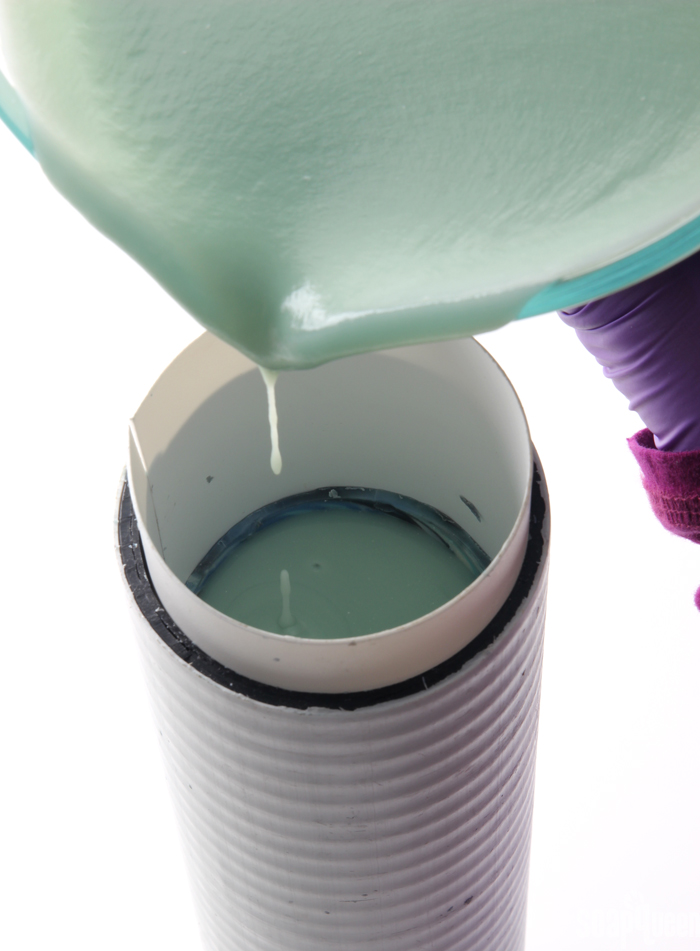
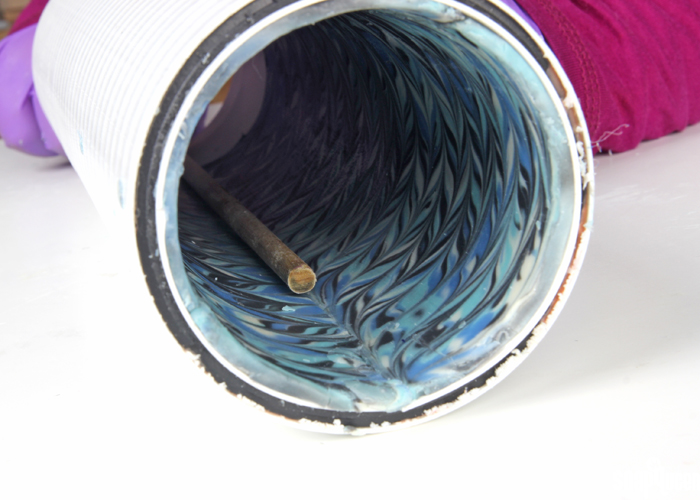
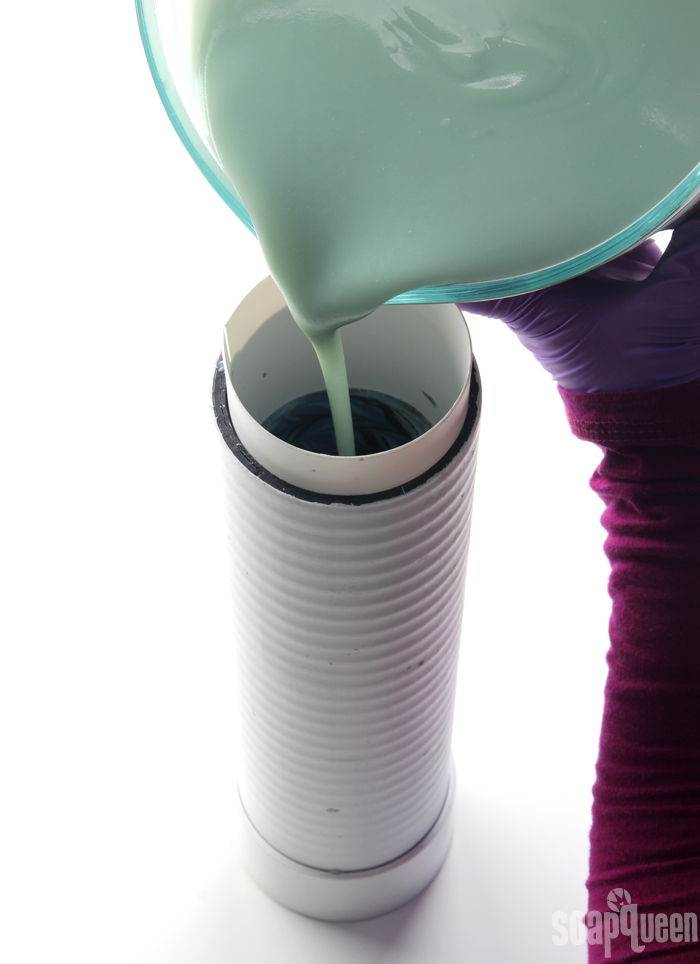
 FOUR: Place the end cap very firmly on the bottom of the Heavy Duty Column Mold. Place the mold upright on a flat surface, and carefully pour the blue soap into the mold. Once full, spritz the top with 99% isopropyl alcohol and allow to harden in the mold for about 2 days.
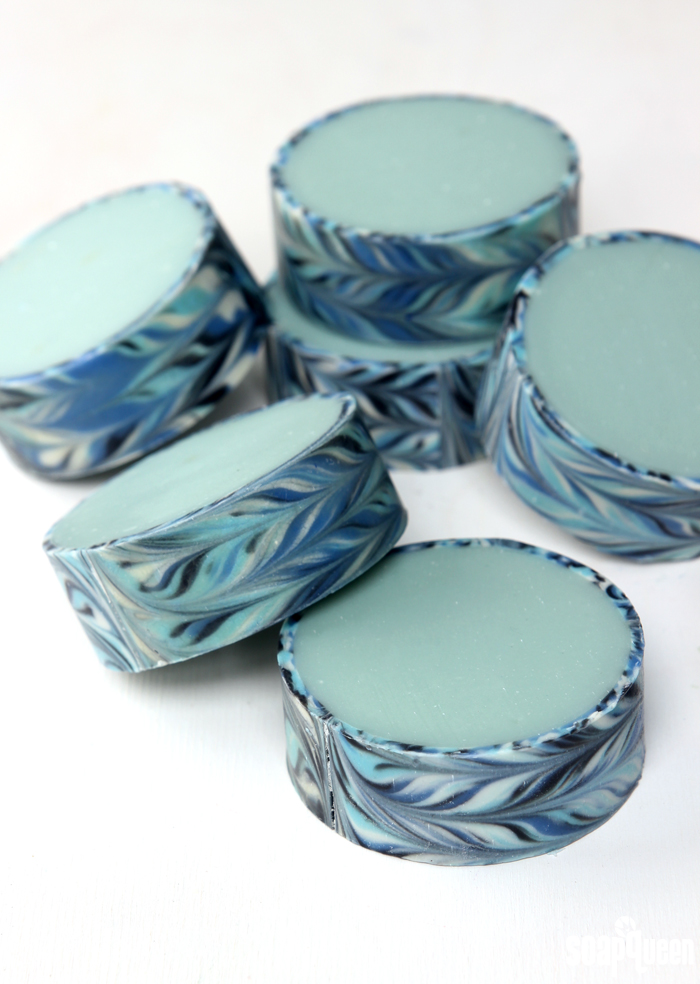
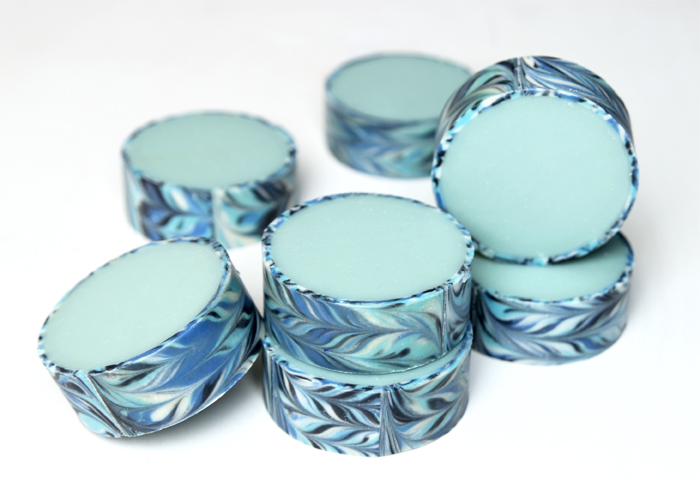
Remove the liner from the mold and peel away. Then, cut the soap into bars and allow them to cure for 4-6 weeks. Enjoy!