Recipe submitted by Jennifer of Jennifer’s Handmade Soap
This recipe is for a Peach Pie Soap, but you can adapt this same concept for any type of pie soap you want, Apple, Strawberry-Rhubarb, Blackberry, Cherry…you name it!
Note: This is a more advanced tutorial. If you have never done an In-The-Pot Swirl be sure to check out this tutorial before attempting this recipe.
Ingredients:
5.4 oz. Avocado Oil
1.35 oz. Meadowfoam Oil
10.75 oz. Coconut Oil
10.75 oz. Olive Oil
10.75 oz. Rice Bran Oil
10.75 oz. Palm Oil
5.4 oz. Shea Butter
7.5 oz Lye (5% Superfat)
18.15 oz. Distilled Water
Yields: 80.65 ounces
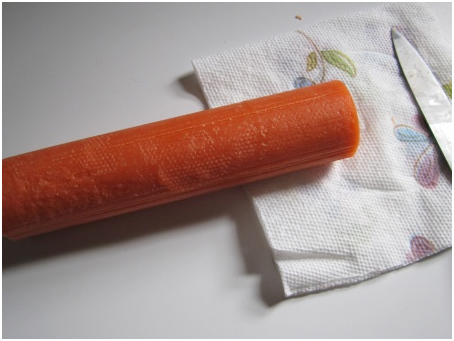
Step 1: This soap has to be made over a couple of days. To make the embeds (peaches), make a small batch of soap of your choice of color and fragrance. I used Peach Fragrance Oil and Peach Shimmer Mica in mine. The first step involves making the embeds for the top of the loaf. Two days before make a small batch of soap. In a 1 1/2″ PVC tube pour approximately 10 oz. of soap into the mold. Unmold 2 days later. Then cut it into slices and cut the slices in half so it sort of looked like peach slices.
Step 2: Once they are ready it’s time to mixed up a batch of soap. Set about 1.5 cups of soap aside for the crust then split the rest into two colors. From there it is a simple in the pot swirl.
Step 3: After pouring the soap embedded all the cut up peach slices on top.
Step 4: Next mixed up the pie crust soap. You can use a gold/yellow color to get the color to resemble a pie crust.
Step 5: Last step is piping the crust. You’ll need a pastry back and two different sized tips.
#47 tip for the lattice
#17 or #18 for the edge
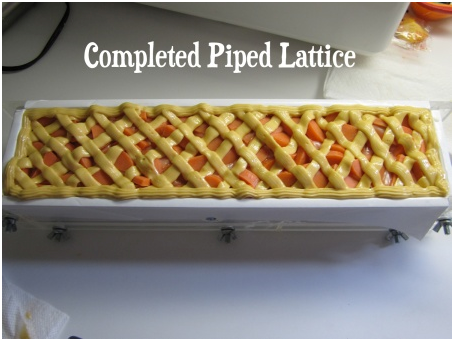
Step 6: Once your mixture is thick enough to pipe (note it doesn’t have to be as thick as you would need it if you were piping cupcakes, just thick enough to hold the shape) it’s time to start creating the lattice. Do one side at a diagonal across the soap and then go back and crisscross the other side.
Note: It works best if you keep your tip as close to the soap as you can.
Step 7: Once you’ve finished the lattice now it’s time to pipe the edge. Change to your #17/#18 tip and go around the edge of your mold to pipe the crust.
Step 8: Finally sprinkled some glitter on top and after 18-24 hours it’s ready to cut!


