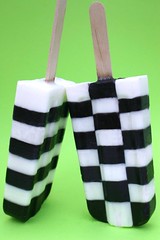
Today Mattielou sent me an email asking how to make the Checkered Soapsicles she saw in my Flickr account. Luckily she caught me as I was drinking a Starbucks and I had all the energy in the world to rehash the process. In case you're interested, here's how to do it:

Hi Lynne-
Regarding the checkered soapsicles, I didn't put that project in my book because it's ridiculously hard. But if you want to give it a shot, here's what you do:
Make a batch of white soap and black soap. Make the black soap really dark because if it's not dark enough it looks grey instead.
Now measure carefully 2 tablespoons of white soap and pour it into a mold, being super careful that none of it touches the sides of the mold. Let it set, then alternate stripes of black and white. Measuring accurately is critical!
Here's the thing: you're going to make 2 molds that start with white, and 2 molds that start with black.
Hopefully you've made soapsicles before so you know how to insert the stick and unmold them.
Once they're unmolded, you have to do some soap magic. Cut each soapsicle lengthwise into thirds. Now take 2 sections that are the opposite pattern of 1 center section. Melt some clear soap base. Spray each cut end with alcohol, paint on some clear soap, and glue on the side sections.
Voila! Checkered soapsicles!
The things that are really tough about these are:
1) not getting any drips on the sides of your mold.
2) making sure every layer is the exact same thickness or else your checkers won't match up
3) making sure you cut each soapsicle at the exact same place or else they won't look right when they're glued together
Plus they're really just decorative. So I'm not sure if you want to go through all of the hard work, but in case you do, that's how it's done!

Have fun, and let me know if you decide to make them! (I'm sure other color combos would be awesome and not as obvious if there were drips, such as white and pink or white and lime green. Just make sure all dyes are non-bleeding!)
Phew!
Have a great day,
Debbie


