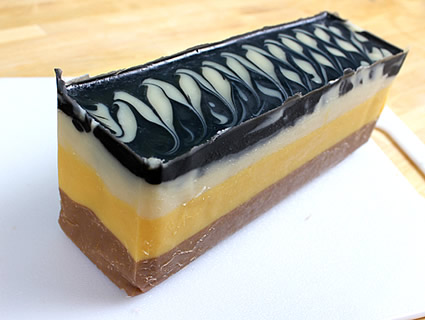
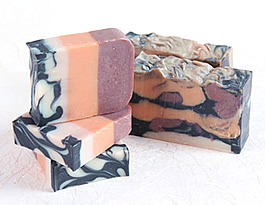
 When was the last time you soaped with Tamanu Oil? Tamanu Oil comes from the nut of the Tamanu Tree, found inside the inedible fruit that is only produced once a year. Tamanu Oil has a very earthy smell and slightly grainy texture. It smells sort of like nutty, musky dirt. Not only is it great for pampering your face, but we decided it was the perfect ingredient for our Man Soaps too. We paired it with Leather fragrance oil for some extra masculine flair, and added some light exfoliant with a bit of Orange Peel Powder.
If you have never made cold process soap before, we strongly suggest getting a couple of basic recipes under your belt before diving in. Check out Soap Queen TV on Cold Process if you want to get started with cold process.
11.0 oz. Coconut Oil
17.6 oz. Olive Oil
11.0 oz. Palm Oil
4.4 oz. Palm Kernel Flakes
6.4 oz. Lye
14.5 oz. Distilled Water
3 oz. Meadowfoam Oil
1 oz. Tamanu Oil
1 tsp. Cappuccino Mica
1 tsp. Yellow Oxide
.5 tsp. Activated Charcoal
.5 tsp. Super Pearly White Mica
3 tsp. Orange Peel Powder
3.5 oz. Leather Fragrance Oil
2 pound Wood Log Mold
Silicone Loaf Mold
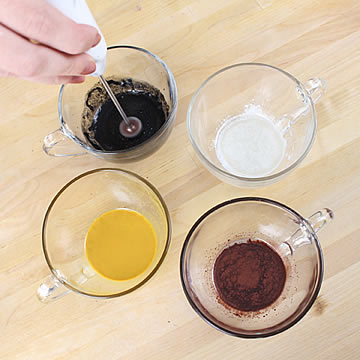
PREP: Line your 2 pound wood log mold with freezer paper (shiny side up!). Have a second mold ready for the bonus round (we used a flexible loaf mold). Mix 1 tsp Yellow Oxide with .5 oz. Meadowfoam oil, 1 tsp. Super Pearly White with .5 oz. Meadowfoam Oil, 1 tsp. Cappuccino Mica with .5 oz. Meadowfoam and .5 tsp. Activated Charcoal with .25 oz. Meadowfoam oil. Use your mini-mixer to make sure there are no clumps.
ONE: Suit Up! Safety gear on: that means long sleeves, rubber gloves, and goggles. Carefully mix your lye water by adding the lye to the water (never the other way around). Mix until the lye is fully incorporated into the water and the water is clear, then set aside.
TWO: Melt your Coconut Oil, Palm Oil, and Palm Kernel Flakes then mix in your Olive Oil and stir the oils well.
THREE: Carefully add the lye water to the oils, stick blending until you reach light trace. Add 1 oz. Meadowfoam Oil, 1 oz. Tamanu Oil, and 3.5 oz. Leather Fragrance Oil and mix until just blended, taking care to not allow the soap to get to thick trace.
TIP: Does your Tamanu appear to have little specs floating around in it? No worries! That’s normal for the oil. Just pop it in the microwave on 10 second bursts with the lid off, and they should go away after one or two rounds.
FOUR: Divide your batch into four parts. Two of those parts are going to be 2.5 cups, and the other two parts are 1.25 cups. You can eyeball it, as long as you have two parts that are about twice as big as the other two parts.
FIVE: Switch to a whisk as your blending tool to inhibit accelerating trace. Color one of your 2.5 cup parts with Yellow Oxide and the other with Cappuccino Mica and three tsp. Orange Peel Powder. Color on of the 1.5 cup parts with Activated Charcoal and the other with Super Pearly White Mica.
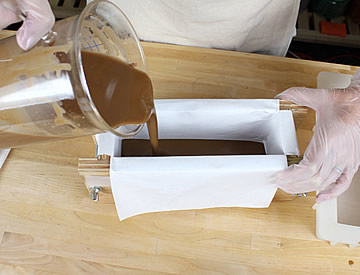
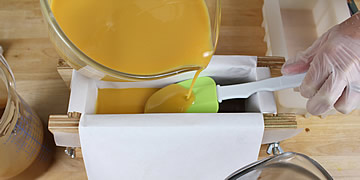
SIX: Fill your wood log mold about 1/3 full with the Cappuccino and Orange Peel Powder Soap. Using the back of a spoon or spatula, pour the second layer with the Yellow colorant. Remember that you’re going to have some soap left over! We’ll take care of that in a moment.
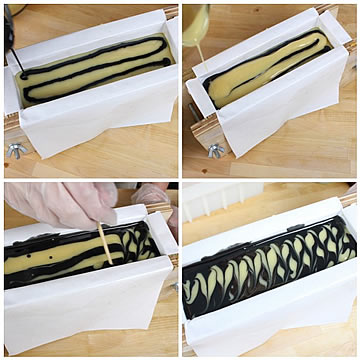
SEVEN: Following the yellow layer, we are going to do a black and white swirly top layer! Pour a layer of Super Pearly White colored soap. Fill about half to three quarters of the space left in the mold after the first two layers. Then, take the black soap and with a slow but steady pour, create a thread of soap length wise in the mold. Keep in mind that the further your container is away from the soap, the deeper the black soap will penetrate the white; we don’t want the black soap so deep that it mixes with the yellow, so vary your pouring height a bit but not too much.
EIGHT: Once you have what looks like a striped top layer, take skewer, toothpick, or other tool and swirl the soap perpendicular to the stripes you just created. Make sure that your swirling tool isn’t going too deep, we don’t want to swirl the layer underneath the white and black!
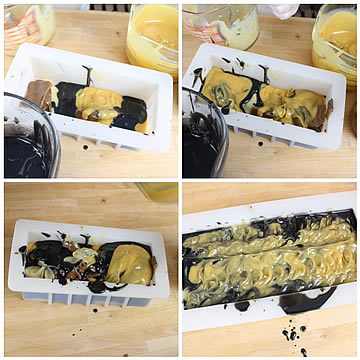
NINE (BONUS SOAP!): I bet you’re going crazy wanting to know what to do with your leftover soap, huh? Well, here we go! At this point, the extra soap has had time to come to a nice, thick trace (it might need a quick mix with the whisk). Grab enough spoons so that each color has its own, then start plopping the soap by the spoonful into your loaf mold. That’s right, I said plop! This technique is nothing precise; just plop, plop, plop with the different colors. Plop some yellow here, black there, white on the side, just go with your gut until that mold is full. Ta-da! Bonus soap!
TIP: You might have enough time to use your swirling tool in your spoon plop soap, but we didn’t do anything after the last plop and we think ours turned out great!
TEN: Let the soap sit in the molds for 24-48 hours. Unmold and cut! The three layered soap will look pretty uniform throughout, but your spoon plop (swirl) soap should look different with each cut! Let cure for 4-6 weeks, and admire your hard work. Two soaps in one, how cool is that?

